

Adjustment Layers Premiere Pro [2022] (How To Use)

The Adjustment Layers feature in Adobe Premiere is a powerful tool for color correction and creative manipulation of video footage.
With adjustment layers, you can make changes to the look and feel of your videos without altering the underlying footage itself.
This makes it perfect for finetuning your videos or for experimenting with new looks and styles.
We are the experts on this. We will teach you how to use this feature properly. We’ll take a look at how adjustment layers work in Premiere and show you some of the things you can do with them.
See other related articles:
In Premiere Pro, what is an adjustment layer?
Adjustment layers are a feature in Adobe Premiere Pro that allows you to add effects and color grading to the files on your project timeline.
They can be accessed via the Project browser. Consider the adjustment layer to be a video clip.
Watch this Video Layer Adjustment
It follows the same procedure. It can, for example, be dragged to and onto your timeline. With a few mouse clicks, you can cut, disable, or eliminate an adjustment.
All effects added to an adjustment layer have an impact on all video files underneath it. As a result, adjustment layers become a strong and versatile tool in Premiere Pro.
The benefit of using them as intended is that it offers a clear overview of the effects you applied.
You can only apply an effect to an individual or nested clip if you don’t use adjustment laters.
When you employ a lot of clips for a project, it’s only a matter of time until you lose track of the effects you used on each one.
In Premiere Pro, how do you make adjustment layers?

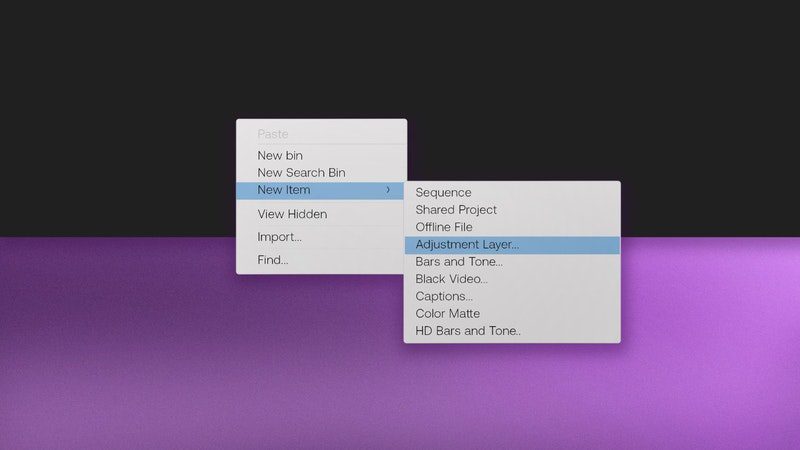
You must first create the adjustment layer before you can add effects to it.
You can use as many adjustment layers as you want for your project.
Select File > New > Adjustment Layer from the menu bar, or select “New Item” in your project panel > adjustment layer.
Confirm the parameters, which will be set to the same as your sequence, by clicking OK.
In your project panel, double-click the new adjustment layer or right-click > rename to rename it.
I always name the effect I wish to use, such as “cinematic black bars” or “color grade.”
Make a copy of the Adjustment Layer and paste it into your Sequence.
Fortunately, the adjustment layer can be found in your Project browser alongside your other clips and assets, as you shall see.
1. In your Project browser, select the Adjustment Layer from the drop-down menu.
Move it into position on your timeline, making sure it is stacked above any other clips to which effects are to be applied.
3. Extend the ends of the Adjustment Layer so that they cover the entire region where you wish to apply the effects.
Fill in the blanks with your color grade
It’s a good idea to apply whatever color grading you desire before applying any effects, as this will serve as the foundation for how the clip will seem.
1. Select the Color workspace from the drop-down menu.
2. With your Adjustment Layer selected in the sequence, navigate to the Lumetri Color panel on the right-hand side of the screen.
3. Make your color adjustments, keeping in mind that the effect will be applied to every clip immediately below it on the timeline.
Adding a Lumetri color effect to an adjustment layer in Premiere Pro is a simple process.
In this stage, I’ll show you how to apply a Lumetri color effect to the adjustment layer as well as how to apply various video effects to the layer as well.
- 1. By selecting the adjustment layer in your sequence, you can draw attention to it.
- 2. Open the Lumetri color panel in Adobe Premiere Pro and make any necessary adjustments.
- 3. Make the necessary color changes to your liking. Alternatively, if you have a LUT, you can use it.
Add Your Own Special Effects
The next step is to incorporate your special effects.
In this example, we’ll make some color adjustments, as well as add some noise, grain, and a vignette to the image.
- 1. In the Effects workspace, on the right-hand side, look for your desired effect by typing its name.
- 2. Drag and drop the effect into the Adjustment Layer with your mouse.
- 3. Change the effect parameters in the Effects Control panel.
- 4. Continue to add and alter effects until you are satisfied with the overall appearance you’ve achieved.
Using Premiere Pro, how do you preserve an adjustment layer?
There are a variety of reasons why you might want to save an adjustment layer in Photoshop.
For example, in my situation, I can reuse the letterbox that has been developed for future projects.
Adobe Premiere Pro provides the option to save your adjustment layer effects as a preset, which can be used in the future.
This gift will appear in your effect panel, where you can access it whenever you start a new project using it.
Choose the adjustment layer in the sequence where you wish to store the effects from and click OK to save the changes.
Navigate to the effects control panel and choose all of the effects that you wish to include in your preset by checking the appropriate boxes.
Hold down the command (on an Apple device) or control (on a Windows device) key to select more than one effect.
Right-click and pick “save preset” from the context menu.
Save your preset by giving it a name.
The saved preset can be found in the effects panel of your computer (project panel). It is possible to drag and drop the preset to any other clip or adjustment layer from there.
How can you use adjustment layers in Premiere Pro to make your workflow more efficient?
As previously stated, using adjustment layers in premiere pro on a regular basis can help you learn how to gain more control and flexibility when editing.
As a consequence, an efficient workflow is created, allowing for more structured editing. With the help of Premiere Pro adjustment layers, I’ll go through some of the most crucial principles you should keep in mind when trying to improve your editing workflow.
1. Create a variety of effects by combining different adjustment layers.
Adobe Premiere Pro allows you to stack as many adjustment layers as you need to achieve the desired result.
Simply create a new video track and drag the newly created adjustment layer onto it.
Although you can apply many effects to a single adjustment layer, doing so in this manner helps to keep things organized.
Additionally, it is more flexible to modify the effects that have been applied per-adjustment layer.
2. Use different colors to distinguish between the different adjustment layers.
With a right mouse click, you may label an adjustment layer, which will allow you to pick it in the timeline.
Then select “label” and the color you want to use.
This will make the varied effects of the adjustment layer more evident and make it easier to distinguish between them.
Because you will most likely always utilize the same color for the same effect throughout time, you will be able to distinguish between the different adjustment layers even more quickly.
3. Color correct each clip individually, then utilize the adjustment layer to color grade the final product.
In the event that you apply a Lumetri color effect to an adjustment layer, I recommend that you use it just for the color grade or the LUT.
In actuality, each clip necessitates a unique color correction because the white balance and exposure settings for distinct pictures are almost never the same.
Alternatively, if you want to achieve a consistent “look” throughout all of your clips, you can use a color grade or LUT on an adjustment layer to do this.
This is a simple method of ensuring that all of your video clips have the same style and appearance.
4. Create keyframes for the effects that have been applied to each adjustment layer.
The beauty of using separate adjustment layers for different effects is that you can keyframe this effect in a variety of ways to suit your needs.
For example, if you want to gradually increase and decrease the opacity of an applied effect, you can do so by adding keyframes to the effect controls window.
5. Arrange the several adjustment layers in your project window according to their function.
In the same way that you organize your video clips into separate bins according to subject or location, you may organize the different adjustment layers into distinct bins as well.
Create a new bin in your project panel and label it “Adjustment layers” in your project panel. Create a new adjustment layer in this bin, or transfer existing adjustment layers into this bin from another folder.
This method allows you to keep everything much more structured and prevents the creation of adjustment layers in the film bins.
Editing Workflow Best Practices for a Stress-Free Experience
As with any editing process, things can go wrong or act in unexpected ways from time to time.
To help you keep your adjustment layers structured and trouble-free, we’ve compiled a list of helpful hints.
Always give your adjustment layers meaningful names.
Giving your adjustment layers names will save you a tremendous amount of time, especially if you are experimenting with a variety of different looks.
A well-organized project browser improves the efficiency of your editing, which should be the goal of every editor.
Before you color grade, make sure you color correct.
If you intend to add color grades to your adjustment layer, it is critical that you complete all of your color repairs before proceeding with the next step.
Please keep in mind that your adjustment layer will have an impact on everything in the sequence, and your grade will appear different from clip to clip.
As with any editing workflow, you should make sure that your clips are in proper working order before applying the grade.
Make Use of Keyframes to Express Yourself
Because the adjustment layer has the same properties as a clip, you can keyframe effects that you would not be able to keyframe in any other way.
Keyframed adjustment layers may be used to produce some extremely cool effects.
Here are our top three favorites that we’ve come up with:
Apply the Gaussian Blur effect to your sequence, and keyframe the Blur Amount parameters to achieve the desired result.
The ability to add titles to your footage can be extremely beneficial in a variety of situations.
Make use of the Lumetri Color Saturation parameters to produce a color transition in the style of the Wizard of Oz; alternate between black and white and full color.
To gradually fade your sequence into black and white, use the Leave Color effect to remove all but one color from the sequence.
For music videos and event promotions, this technique is particularly effective because it makes use of many varied and brilliant colors in the scene being depicted.
Our Final Thoughts
When used properly, adjustment layers can be a lot of fun to work with since they allow you to play with your developing visual effects talents in a straightforward manner.
They can also save you time, both in terms of the time it takes to add and edit your effects, as well as through the use of convenient preset functions.
For those of you who are just starting started using adjustments layers in Premiere Pro, we hope this article may be of assistance in streamlining your editing process.
For those who use them on a regular basis, you might want to experiment with keyframing to boost your editing.
Frequently Ask Questions
What is the best way to modify layers in Premiere Pro?
Add an adjustment layer to your project.u003cbru003eu003cbru003eSelect File u0026gt; New u0026gt; Adjustment Layer from the menu bar.u003cbru003eu003cbru003eMake any required adjustments to the adjustment layer settings in the Video Settings dialog box, and then click OK to close the window.u003cbru003eu003cbru003eDrag (or Overwrite) the adjustment layer from the Project panel onto a video track above the clips in the Timeline that you wish to change, and then close the Project window.u003cbru003e
What exactly is an adjustment layer in the first place?
Preferences in Premiere Pro Layers are transparent layers that can have effects applied to them in the same way that you would to a conventional video track. u003cbru003eu003cbru003eAdjustment layers have the additional benefit of just affecting the levels above them, so you can move them below any layers you don’t want to be affected.
What is the procedure for creating an adjustment layer?
Add an adjustment layer to your project.u003cbru003eu003cbru003eSelect File u0026gt; New u0026gt; Adjustment Layer from the menu bar.u003cbru003eu003cbru003eMake any required adjustments to the adjustment layer settings in the Video Settings dialog box, and then click OK to close the window.u003cbru003eu003cbru003eDrag (or Overwrite) the adjustment layer from the Project panel onto a video track above the clips in the Timeline that you wish to change, and then close the Project window.u003cbru003eu003cbru003e
Originally posted on January 11, 2022 @ 9:01 am


![How to remove black bars from the video in Adobe Premiere? [3 Easy Steps!]](https://reneerobynphotography.com/wp-content/uploads/2022/09/image-37.jpg)

![How to freeze frame in premiere? [ 4 Simple Ways! ]](https://reneerobynphotography.com/wp-content/uploads/2022/11/image-768x404.png)
![After Effects Mask [2022] (All You Need To Know)](https://reneerobynphotography.com/wp-content/uploads/2022/01/s6-After-effects-768x432.jpg)
![Adobe After Effects Prices [2022] (Answered!)](https://reneerobynphotography.com/wp-content/uploads/2022/01/maxresdefault-4-768x432.jpg)